How long will it take to build a simple 2D Game Engine?

It took me three years to develop a 3D game engine. So I'm estimating that a decent 2D game engine should take about 1–1.5 years.

How long would it take to build a SIMPLE 2D engine?

I would estimate it should take you a couple of weeks. However, I doubt that you would call that an engine.

A game engine is a complex architecture. It is composed of algorithms and design patterns. All working together to render characters on a screen efficiently.

On the rendering side, your engine will need to render the different type of objects. Such as 2D images, sprites, text, etc. Thus, you will need to set up a Rendering Manager. The Rendering Manager will take care of all OpenGL operations.

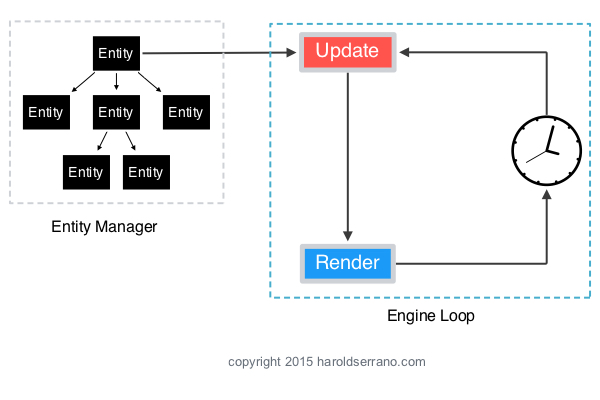
You are also going to need to implement a Scenegraph. A scenegraph is a tree-like structure used in game engines to traverse game entities efficiently. The Scenegraph provides game entities to the Engine Loop. The engine loop then renders and updates the coordinate space of each entity.

In my opinion, a game engine is not an engine without a physics engine and a collision detection system.

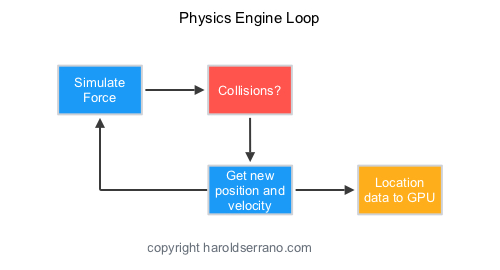
How does a Physics Engine work? In a nutshell, A physics engine is responsible for solving the equation of motion and for detecting collisions. You can think of a physics engine as a continuous loop. It starts off by simulating an external force such as gravity. At each new time step, it detects any collisions, then calculates the velocity and position of an object. And finally, sends the location data to the GPU. This continuous loop creates the illusion that an object is falling due to gravity.

A physics engine does this by integrating Newton's Equation of motion. In computers, Integrals are evaluated using Numerical Integrations. Thus, you will have to implement at least the Euler Method. However, if you want a more precise method, you will need to implement the Runge-Kutta method.

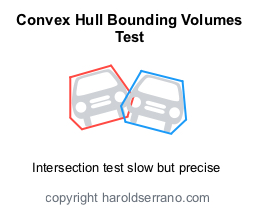
To detect collisions, you will need to implement a Collision Detection System. A collision detection system works by detecting if bounding volumes are intersecting. You can set up your collision system to use spherical bounding volumes. However, they return many false detections.

A more precise detection system uses Convex Hulls as bounding volumes.

The intersection between Convex Hulls is computed using the Gilbert-Johnson-Keerthi (GJK) algorithm.

The GJK only tells you if two objects collided. It does not provide the Collision Contact Points. These points are essential to computing the proper collision response (impulse and resulting velocities) of collided characters. To obtain these Contact Points, you need to implement the Sutherland-Hodgman Algorithm.

The items listed above, are the minimum set of algorithms you need to implement to have a decent game engine. Nothing fancy or brag about. And per my experience, it should take you about 1-1.5 years to implement a 2D game engine you can be proud of.

P.S. Sign up to my newsletter and get Game Engine development tips. Or Get a Copy of my book below.

Creating a Framework in Xcode

My game engine is currently in beta phase. I have not released the engine to the public yet. Part of it is due to unresolved bugs present in the engine. Although the engine can handle a full blown game, such as a soccer game , I'm afraid that it is not ready for prime time.

Regardless if I release the engine to the public or not, I am interested in knowing how I would create my engine into a distributable framework using Xcode. It turns out that creating a framework using Xcode is very simple.

These are the steps to create a framework in Xcode:

Creating a framework

Step 1:

Create a new project and select "Cocoa Touch Framework."

Step 2:

Give your framework a name and select "Objective-C" as the language. Make sure the "Include Unit Tests" box is unchecked.

Xcode will generate a header file with the name of your framework. In this header file, we will include the header files of your API. So let's create the API.

Step 3:

Create a file representing your API and give it a name. I called the files "MyAPI."

Step 4 (Optional):

You don't have to do this if you code in Objective-C. But I like to code in C++; thus I need to change the extension of the files to ".mm" as shown in the image below.

Step 5:

Declare and implement your API files. In this example, I created a class with a "printHello" method.

Step 6:

Your users will not be able to use your framework unless you make the API header files Public. If you select the MyAPI header file and open up Xcode Utility pane, you will notice that under "Target Membership" the header file is set to "Project."

Make sure to set the header file to "Public."

Step 7:

Now, we need to import all the public header files of your API. To do so, open up the framework header file "MyFirstFramework.h" and import all public header files of your API. See highlighted line in the image below:

Here is a larger image. See line 20.

Screen Shot 2017-05-20 at 12.10.54 PM.png

Step 8:

Select Product->Build to build the framework. You can also use Command+B to build it.

At this point, the framework is ready to be distributed to your users.

Step 9:

If you need to locate your framework, right-click on the framework and click "Show in Finder." See the image below.

Screen Shot 2017-05-20 at 10.26.41 AM.png

Testing your Framework

Step 1:

Let's test your framework in a new project. Create a new "Single View Application" project in Xcode.

Step 2:

Give it a name and select "Objective-C" as the language.

Step 3:

Copy your framework into the new project. To locate your framework, see Step 9 above.

Step 4:

We need to make sure that the new project has the proper settings before it can use the framework.

Click on Build Phases and make sure that your framework is in the Link Binary With Libraries section.

Step 5:

Click on General. You will notice that the Embedded Binaries section doesn't include the framework.

Add the framework in the Embedded Binaries section.

Step 6:

You will notice that the Linked Frameworks and Libraries section contains a duplicate copy of the framework. Remove one of the copies.

Step 7 (Optional):

Since I use C++ in the framework, I need to change the extension of the AppDelegate and ViewController files to use the ".mm" extension.

Step 8:

Now you are ready to use the framework in the new project. Import the framework as shown in line 11 in the image below. You can now call the API classes as shown in the "viewDidLoad" method in the image below.

Build and run the project. And that is it.

Hope this helps.

How to become a game engine developer

I started blogging about Game Engine Development a few years ago. I started doing so because the educational materials on game engine development were limited and most books on the subject were too dense.

It took me a lot of trial & errors to figure out how to develop a game engine. Now that I have developed one, I know the learning path that you need to take to become a game engine developer.


These are the steps:

Step 1: Learn Linear Algebra

First, learn Linear Algebra. No, I don't mean Algebra taught in middle school. I mean Linear Algebra concepts such as Vectors and Matrices. Focus on learning vector and matrices operations, especially dot product, cross product, space transformations.

Step 2: Learn C++ (or any language you want)

Next, learn how to program. I suggest learning C++. At this point, you don't have to be an expert in coding. But do learn about classes, methods, inheritance, polymorphism and encapsulation.

Step 3: Develop a Math Engine

Then, use your knowledge of vectors, matrices, and coding to develop a math engine. Operations such as Dot product, cross product and space transformation are used extensively in game engine development.

Step 4: Learn Computer Graphics

Now comes the fun part. Get acquainted with Computer Graphics concepts, especially the Rendering Pipeline and Shaders. Avoid coding and using the OpenGL API for now. The OpenGL API is confusing to understand if you have limited knowledge of computer graphics concepts.

Step 5: Learn OpenGL and do a lot of projects

Once you feel comfortable with Computer Graphics concepts, learn about the OpenGL API and OpenGL Shaders. Do as many projects as possible. Learn how to render characters, how to rotate and translate characters. Learn how texturing and lighting works with OpenGL. Again, this is the fun part, and I suggest doing as many projects as you can.

Step 6: Learn Design Patterns

The next step to becoming a game engine developer is to learn API architecture. A game engine is simply an API, a framework, that takes care of all the rendering, physics and mathematical operations. It is paramount that you develop an API that is modular, flexible, maintainable and adaptable.

To develop an API, you will need to learn Design Patterns. The most common design patterns are Singleton, Observer, Strategy, Composite, Factory among others.

Step 7: Develop a Rendering Engine

At this stage, you are ready to combine your knowledge of Linear Algebra, Computer Graphics, OpenGL and Design Patterns to develop a rendering engine.

Step 8: Review Newton's Laws of Motion

Once you have completed the rendering engine, is time to work on the hardest part of the engine, i.e., the Physics Engine.

The good news is that you don't need to be a physicist to develop a Physics Engine, but you do need to know Newton's Laws of Motion and how they are implemented using algorithms such as the Runge-Kutta algorithm.

Step 9: Learn Computational Geometry Algorithms

A game engine is not a game engine without collision detection. To develop a collision detection system, you need to learn about Computation Geometry algorithms such as GJK, BVH, and Sutherland-Hodgman. These algorithms are used to detect if a collision occurred, where did it occur and which objects are most likely to collide.

Step 10: Develop a Physics Engine

Once you are acquainted with the algorithms mentioned above, you should be able to develop a physics engine with a collision detection system.

Step 11: Develop a game, Test & Repeat

Congratulations, you now have a Game Engine. Develop as many games as you can and test the game engine as much as possible. Fix bugs, implement new features, develop games and repeat. Trust me; this is the best part of all.

Books to get started

Here is a list of books to help you get started:

3D Math

  1. 3D Math Primer For Graphics and Game Development

Rendering Engine

  1. OpenGL Superbible: Comprehensive Tutorial and Reference
  2. Graphics Shaders: Theory and Practice, Second Edition

Physics Engine

  1. Physics for Game Developers: Science, math, and code for realistic effects
  2. Game Physics Engine Development: How to Build a Robust Commercial-Grade Physics Engine for your Game
  3. Real-Time Collision Detection

Hope this helps

Should you develop a game engine or a game?

As someone who developed a 3D game engine from scratch, you may want to listen to what I have to say.

If your goal is to learn what makes a game engine tick, then go ahead and develop an engine. It is the best thing you can do. I guarantee you that you will become an expert in computer graphics, OpenGL, Linear Algebra, and computational geometry algorithms.

However, developing a game engine is an INSANELY complicated task. It took me about four years to develop the basic framework of the engine. That's right. Just to develop the basic framework of a 3D game engine took that long. By "Basic" I mean that the engine has a collision detection system, a physics engine, rendering engine, animation system, a Digital Asset importer, etc.

To test the features of the engine, I decided to develop a full blown soccer game. It is still a work in progress. Here is a video of the latest game update:


Here is another video that showcases what the engine can currently do:


And here is one of the very first demos showcasing the basic framework:


All in all, it has taken me about four years to develop the engine. However, the engine is not complete yet. There are bugs and issues with it. As I work on the soccer game, I'm finding more and more issues.

An engine requires a lot of maintenance and time; time that could be better spent developing your game instead. Thus, if you just want to develop a game, use an existing game engine instead.

You may be curious how a game engine works. If that is the case, I wrote several articles on game engine development that should give you a pretty good idea how it works.

How does a game engine works?

How does a rendering engine works?

How does a physics engine works?

And if you are interested, you can get a copy of my eBook: Components of a Game Engine

Enjoy

Implementing team formation-Soccer Game v0.0.4

This week was a very productive week for the development of the soccer game. As you can see in the video, I implemented most of the 11 players per team. Currently, I'm missing the goalies.


I improved the performance of the game by disabling shadows and collision detection on all but three players; dribbling player, receiving player and defender. Thus, at any time, the engine only renders a shadow to the player currently dribbling, the player who will get a pass and the defender. The same logic was applied to the collision system. Only three players have collision detection enabled at any time. Doing so improved the performance by 20%.

You may say that doing so will reduce the aesthetics of the game, and you are right. However, when you play a soccer game, your eyes are mainly focused on the controlling player and the defender. Your vision ignores all other players' aesthetics.

I also improved the AI of the game. Supporter players no longer go out of bound whenever they search for a good passing angle. The same logic applies for defenders. They are smart enough not to go out of bound.

Additionally, I added a feature that controls the strength of the kick depending on how long you press the game buttons. The longer you press the buttons, the stronger the pass; thus the farthest the ball will travel.

Implementing the 4-4-2 team formation

Up to now, I have been developing the soccer game with relatively few game characters. The reason was obvious. I was focused on implementing the properties of individual players and not the team properties.

However, this week I focused on implementing intelligence into the team as a whole. My first task was to apply "Formation" logic into the game.

There are several formations used in soccer. I decided to use the 4-4-2 formation. That is four defenders, four midfielders and two forwards.

The idea of a formation is the following:

When the team is in attacking mode, the formation should spread out; thus creating space.

In contrast, when the team is in defending mode, the formation should shrink; reducing space. Notice that no matter the mode, the team should always keep the 4-4-2 structure.

Since at any time, the game characters could be running towards a passing angle or defending positions, it made sense to implement separate game objects that serve as reference points for the players.

These game objects (formation objects) would spread out or come together depending on the state (attacking/defending) of the team. Each player is assigned a formation object and would use the position of the formation object only as a reference. The formation objects are shown as squares in the image below.

Doing so keeps the structure of team compact and resembling a 4-4-2 formation throughout the game.

Thanks for reading.