Cleaning up the AI Architecture- Soccer Game v0.0.5

The video below shows the latest implementations to the soccer game. In a nutshell, I cleaned up the AI architecture and implemented a Player Indicator.


Implemented modularity to the AI system

This month I focused on cleaning up the AI game architecture. As it turned out I was violating an OOP principle which states that:

A class should have only one responsibility.

In my case, one of the classes was not only responsible for assigning roles to each player, such as the attacker, defender and supporter role. It was also responsible for executing AI algorithms.

To remedy this, I created several classes responsible for AI operations. Specifically, I created an AI class responsible for Defending. And another class responsible for Attacking AI operations.

However, I went further and created an interface for these classes. Doing so provides modularity and flexibility whenever I need to change an AI strategy.

I also implemented methods in the AI to steal the ball from the attacking player. However, it does not know what to do once it gets possession of the ball, yet. I plan to fix this soon.

Added a Player Indicator

In the previous version of the game, it was somewhat hard to follow which player had possession of the ball. To remedy this, I added an indicator which shows who is the dribbling player and what is its heading. The indicator also points out the current defending player.

Improving the Soccer Kits

Finally, I decided to hire a game artist. I was not happy with the soccer kit texture; which was painted by me. He is currently working on the soccer kits, and I like what he has done as of now. Hopefully, by the next version update, I can show you a small video of the game with more realistic soccer kits.


Thanks for reading.

Become a documentarian of your work

I enjoy reading rags to riches stories. They are powerful, inspirational and they resonate with our emotions. Humble beginnings connect us. They are a reminder that no matter who you are, or how broke you are, you do have a chance to succeed.

Game Engine Beginnings. Circa 2013: Implementing the rendering engine.

Game Engine Beginnings. Circa 2013: Implementing the rendering engine.

Now and then, I search on Wikipedia the stories of successful companies. I look for any photos that were taken before they made it big. I enjoy reading their "About" page and get a glimpse of how it all started.

Success is not glamorous as the media sells it. In fact, It is a lot of time working in the dark. I know this fact first hand.

Game Engine Beginnings. Circa 2013: Improving the rendering engine

Game Engine Beginnings. Circa 2013: Improving the rendering engine

I worked over 15,000 hours in developing a 3D game engine. I would wake up at 5 am and work on the engine from 5am-7am before heading to work. I worked on it during my lunch break. And then again after work. And during the weekends, I would work on it for about 16 hours. I wanted to develop a 3D game engine so bad, that it became my life for about three years and a half.

Game Engine Beginnings. March 2014: Improved the engine to render textures.

Game Engine Beginnings. March 2014: Improved the engine to render textures.

Throughout this time, the thought of failure kept disturbing my peace. I kept thinking, what if I fail and have nothing to show? What if this is just a waste of time?

Game Engine Beginnings. April 2015: Improved the shadows in the engine

Game Engine Beginnings. April 2015: Improved the shadows in the engine

However, I found a way to combat it. I was inspired by Austin Kleon to document the humble beginnings of my game engine. At first, I was against this idea. In my mind, nobody would want to see the progress of my game engine. But Austin made me realize that it is the process, not the end product, that makes our work exciting and inspiring.

Game Engine Beginnings. July 2016: Collision Detection System implemented.

Game Engine Beginnings. July 2016: Collision Detection System implemented.

I want to let you know that you are not alone in your struggles. It is OK if your game is not glamorous yet. It is OK if your indie game studio is your room. That is OK if your game only sold ten copies. And there is something powerful about your struggles.

Game Engine Beginnings. Sept 2016: Improved animation and shadows effects.

Game Engine Beginnings. Sept 2016: Improved animation and shadows effects.

The finish line of success does not inspire people. It is the road you took to achieve it. It is your suffering, the pain, the obstacles that make your story interesting. It is what gives others strengths to go beyond they thought possible. It is your underdog story that connects us as human beings and inspires us.

Game Engine Beginnings. Aug 2016: Game engine first demo.

Game Engine Beginnings. Aug 2016: Game engine first demo.

So document your humble beginnings. Share photos and videos of your work in progress. Take screenshots of your game. Share pictures of your indie studio; even if it is your room. Write about your struggles and how you overcame them.

Game Engine Beginnings. Dec 2016: Added particle system to the engine.

Game Engine Beginnings. Dec 2016: Added particle system to the engine.

Don't worry if your game characters look like crap. Don't worry if your game mechanics suck. Don't worry if there are plenty of bugs. It is all OK. As indie game developers, we can all relate and do understand that it is a work in progress.

Game Engine Beginnings. Dec 2016: Tested the engine collision detection capabilities.

Game Engine Beginnings. Dec 2016: Tested the engine collision detection capabilities.

A final product is not interesting. It is not inspiring. What is, is your story.

So what is your story?

How long will it take to build a simple 2D Game Engine?

It took me three years to develop a 3D game engine. So I'm estimating that a decent 2D game engine should take about 1–1.5 years.

How long would it take to build a SIMPLE 2D engine?

I would estimate it should take you a couple of weeks. However, I doubt that you would call that an engine.

A game engine is a complex architecture. It is composed of algorithms and design patterns. All working together to render characters on a screen efficiently.

On the rendering side, your engine will need to render the different type of objects. Such as 2D images, sprites, text, etc. Thus, you will need to set up a Rendering Manager. The Rendering Manager will take care of all OpenGL operations.

You are also going to need to implement a Scenegraph. A scenegraph is a tree-like structure used in game engines to traverse game entities efficiently. The Scenegraph provides game entities to the Engine Loop. The engine loop then renders and updates the coordinate space of each entity.

In my opinion, a game engine is not an engine without a physics engine and a collision detection system.

How does a Physics Engine work? In a nutshell, A physics engine is responsible for solving the equation of motion and for detecting collisions. You can think of a physics engine as a continuous loop. It starts off by simulating an external force such as gravity. At each new time step, it detects any collisions, then calculates the velocity and position of an object. And finally, sends the location data to the GPU. This continuous loop creates the illusion that an object is falling due to gravity.

A physics engine does this by integrating Newton's Equation of motion. In computers, Integrals are evaluated using Numerical Integrations. Thus, you will have to implement at least the Euler Method. However, if you want a more precise method, you will need to implement the Runge-Kutta method.

To detect collisions, you will need to implement a Collision Detection System. A collision detection system works by detecting if bounding volumes are intersecting. You can set up your collision system to use spherical bounding volumes. However, they return many false detections.

A more precise detection system uses Convex Hulls as bounding volumes.

The intersection between Convex Hulls is computed using the Gilbert-Johnson-Keerthi (GJK) algorithm.

The GJK only tells you if two objects collided. It does not provide the Collision Contact Points. These points are essential to computing the proper collision response (impulse and resulting velocities) of collided characters. To obtain these Contact Points, you need to implement the Sutherland-Hodgman Algorithm.

The items listed above, are the minimum set of algorithms you need to implement to have a decent game engine. Nothing fancy or brag about. And per my experience, it should take you about 1-1.5 years to implement a 2D game engine you can be proud of.

P.S. Sign up to my newsletter and get Game Engine development tips. Or Get a Copy of my book below.

Creating a Framework in Xcode

My game engine is currently in beta phase. I have not released the engine to the public yet. Part of it is due to unresolved bugs present in the engine. Although the engine can handle a full blown game, such as a soccer game , I'm afraid that it is not ready for prime time.

Regardless if I release the engine to the public or not, I am interested in knowing how I would create my engine into a distributable framework using Xcode. It turns out that creating a framework using Xcode is very simple.

These are the steps to create a framework in Xcode:

Creating a framework

Step 1:

Create a new project and select "Cocoa Touch Framework."

Step 2:

Give your framework a name and select "Objective-C" as the language. Make sure the "Include Unit Tests" box is unchecked.

Xcode will generate a header file with the name of your framework. In this header file, we will include the header files of your API. So let's create the API.

Step 3:

Create a file representing your API and give it a name. I called the files "MyAPI."

Step 4 (Optional):

You don't have to do this if you code in Objective-C. But I like to code in C++; thus I need to change the extension of the files to ".mm" as shown in the image below.

Step 5:

Declare and implement your API files. In this example, I created a class with a "printHello" method.

Step 6:

Your users will not be able to use your framework unless you make the API header files Public. If you select the MyAPI header file and open up Xcode Utility pane, you will notice that under "Target Membership" the header file is set to "Project."

Make sure to set the header file to "Public."

Step 7:

Now, we need to import all the public header files of your API. To do so, open up the framework header file "MyFirstFramework.h" and import all public header files of your API. See highlighted line in the image below:

Here is a larger image. See line 20.

Screen Shot 2017-05-20 at 12.10.54 PM.png

Step 8:

Select Product->Build to build the framework. You can also use Command+B to build it.

At this point, the framework is ready to be distributed to your users.

Step 9:

If you need to locate your framework, right-click on the framework and click "Show in Finder." See the image below.

Screen Shot 2017-05-20 at 10.26.41 AM.png

Testing your Framework

Step 1:

Let's test your framework in a new project. Create a new "Single View Application" project in Xcode.

Step 2:

Give it a name and select "Objective-C" as the language.

Step 3:

Copy your framework into the new project. To locate your framework, see Step 9 above.

Step 4:

We need to make sure that the new project has the proper settings before it can use the framework.

Click on Build Phases and make sure that your framework is in the Link Binary With Libraries section.

Step 5:

Click on General. You will notice that the Embedded Binaries section doesn't include the framework.

Add the framework in the Embedded Binaries section.

Step 6:

You will notice that the Linked Frameworks and Libraries section contains a duplicate copy of the framework. Remove one of the copies.

Step 7 (Optional):

Since I use C++ in the framework, I need to change the extension of the AppDelegate and ViewController files to use the ".mm" extension.

Step 8:

Now you are ready to use the framework in the new project. Import the framework as shown in line 11 in the image below. You can now call the API classes as shown in the "viewDidLoad" method in the image below.

Build and run the project. And that is it.

Hope this helps.

How to become a game engine developer

I started blogging about Game Engine Development a few years ago. I started doing so because the educational materials on game engine development were limited and most books on the subject were too dense.

It took me a lot of trial & errors to figure out how to develop a game engine. Now that I have developed one, I know the learning path that you need to take to become a game engine developer.


These are the steps:

Step 1: Learn Linear Algebra

First, learn Linear Algebra. No, I don't mean Algebra taught in middle school. I mean Linear Algebra concepts such as Vectors and Matrices. Focus on learning vector and matrices operations, especially dot product, cross product, space transformations.

Step 2: Learn C++ (or any language you want)

Next, learn how to program. I suggest learning C++. At this point, you don't have to be an expert in coding. But do learn about classes, methods, inheritance, polymorphism and encapsulation.

Step 3: Develop a Math Engine

Then, use your knowledge of vectors, matrices, and coding to develop a math engine. Operations such as Dot product, cross product and space transformation are used extensively in game engine development.

Step 4: Learn Computer Graphics

Now comes the fun part. Get acquainted with Computer Graphics concepts, especially the Rendering Pipeline and Shaders. Avoid coding and using the OpenGL API for now. The OpenGL API is confusing to understand if you have limited knowledge of computer graphics concepts.

Step 5: Learn OpenGL and do a lot of projects

Once you feel comfortable with Computer Graphics concepts, learn about the OpenGL API and OpenGL Shaders. Do as many projects as possible. Learn how to render characters, how to rotate and translate characters. Learn how texturing and lighting works with OpenGL. Again, this is the fun part, and I suggest doing as many projects as you can.

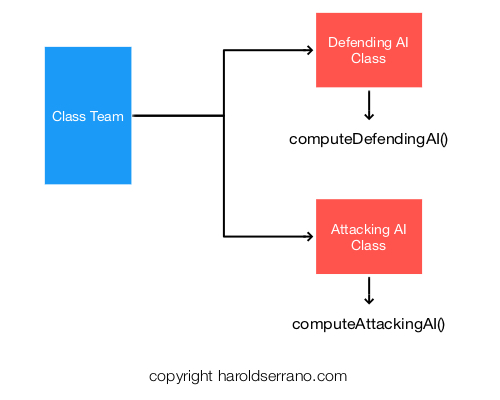
Step 6: Learn Design Patterns

The next step to becoming a game engine developer is to learn API architecture. A game engine is simply an API, a framework, that takes care of all the rendering, physics and mathematical operations. It is paramount that you develop an API that is modular, flexible, maintainable and adaptable.

To develop an API, you will need to learn Design Patterns. The most common design patterns are Singleton, Observer, Strategy, Composite, Factory among others.

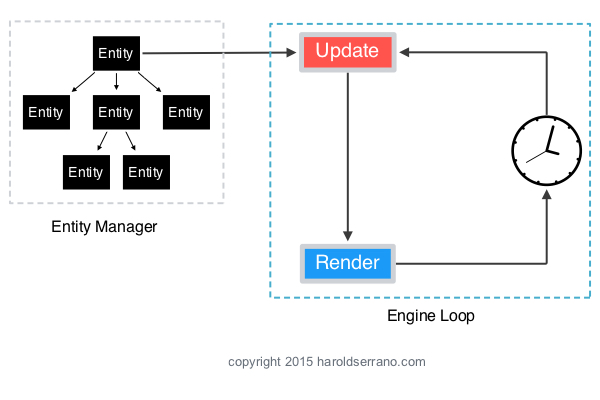
Step 7: Develop a Rendering Engine

At this stage, you are ready to combine your knowledge of Linear Algebra, Computer Graphics, OpenGL and Design Patterns to develop a rendering engine.

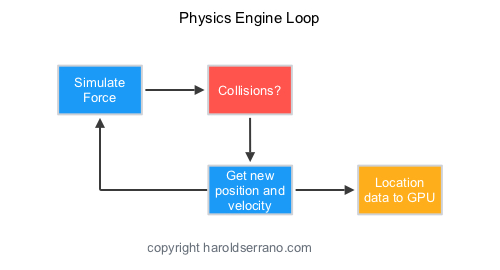
Step 8: Review Newton's Laws of Motion

Once you have completed the rendering engine, is time to work on the hardest part of the engine, i.e., the Physics Engine.

The good news is that you don't need to be a physicist to develop a Physics Engine, but you do need to know Newton's Laws of Motion and how they are implemented using algorithms such as the Runge-Kutta algorithm.

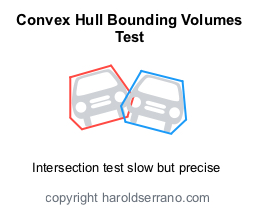
Step 9: Learn Computational Geometry Algorithms

A game engine is not a game engine without collision detection. To develop a collision detection system, you need to learn about Computation Geometry algorithms such as GJK, BVH, and Sutherland-Hodgman. These algorithms are used to detect if a collision occurred, where did it occur and which objects are most likely to collide.

Step 10: Develop a Physics Engine

Once you are acquainted with the algorithms mentioned above, you should be able to develop a physics engine with a collision detection system.

Step 11: Develop a game, Test & Repeat

Congratulations, you now have a Game Engine. Develop as many games as you can and test the game engine as much as possible. Fix bugs, implement new features, develop games and repeat. Trust me; this is the best part of all.

Books to get started

Here is a list of books to help you get started:

3D Math

  1. 3D Math Primer For Graphics and Game Development

Rendering Engine

  1. OpenGL Superbible: Comprehensive Tutorial and Reference
  2. Graphics Shaders: Theory and Practice, Second Edition

Physics Engine

  1. Physics for Game Developers: Science, math, and code for realistic effects
  2. Game Physics Engine Development: How to Build a Robust Commercial-Grade Physics Engine for your Game
  3. Real-Time Collision Detection

Hope this helps