Ever since I was a kid, I've always been captivated by computer graphics effects. The day I decided to look more into computer graphics was when Angry Bird became popular. I was amazed at the "sling-shot" effect and the collision between the blocks. Honestly, I would play the game to figure out how the collision worked.
So, I picked up a Game Development book and learned how to use the cocos2d game engine and the Box2d Physics system. Creating my first game demo with collision detection was exciting. However, the more I learned, the more I became intrigued. I wanted to learn more; I wanted to dig deeper into computer graphics.
Eventually, I decided to develop my 3D game engine, and it was then when I had to opportunity to dive deeper into Computer Graphics, OpenGL, C++, Design Patterns, Linear Algebra, and Computational Geometry.
Throughout the five years of the engine's development, I deciphered how a game engine truly works, what makes it tick and how each component is linked together to make a game possible.
In this post, I'm going to demystify the purpose of the Game Engine Loop.
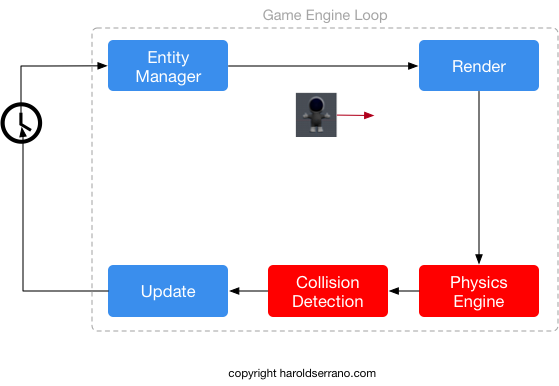
Game Engine Loop
The heart of a game engine is the Game Engine Loop. It is through this loop that the interaction between the Math, Rendering and Physics Engine occurs.
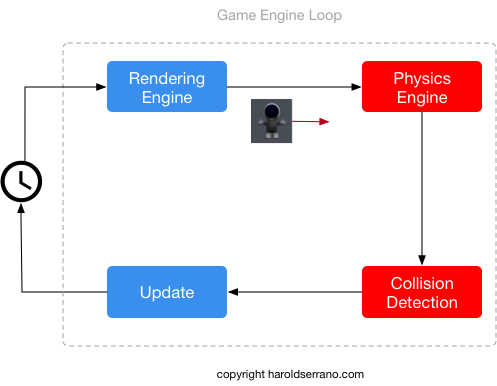
During every game-tick, a character flows through these sub-engines, where it is rendered, and subject to physical-simulated forces, such as gravity and collision-responses.
At a minimum, a Game Engine Loop consists of a Rendering Engine and the Update stage.

Rendering Engine
The first stop of a character is the Rendering Engine. The Rendering Engine's responsibility is to render the character depending on the entity's property. For example, if the object is a 3D character, it will enable the proper GPU Shaders (programs) that will utilize the appropriate attributes to recreate the character on the screen. When it comes to rendering a 3D character, a GPU will require at least these attributes: Vertices, Normal Vectors, and UV Coordinates.

However, if the entity is a 2D entity, the GPU will require only the Vertices and UV-Coordinates of the entity.

Unless you have never seen a video game, you know that a typical game contains more than just 3D or 2D characters. It contains skyboxes, explosion effects, etc. A Rendering Engine is capable of rendering each of these entities by activating the correct GPU Shader during the rendering process.

Updating the Coordinate Space
As mentioned above, to properly render an entity, the GPU requires the attributes of the entity. However, it also needs the space coordinates of the entity.
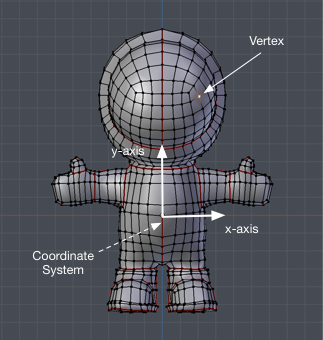
A Space-Coordinate defines the position of an object. Since a game character is made up of hundreds or thousands of vertices, a space-coordinate is assigned to the character, which defines the position of its vertices.
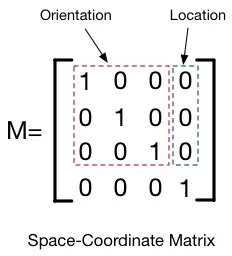
The space coordinates contain rotation and translation information of the character. Mathematically, the space coordinate is represented as a 4x4 matrix. The upper 3x3 matrix contains Rotation information, whereas the right-most vector contains Position information.

The space coordinate of an entity is known as the Model Space.
If you were to send the Model Space to the GPU, a game engine would render the entity on the wrong location on the screen. You may not even see it at all.
Why?
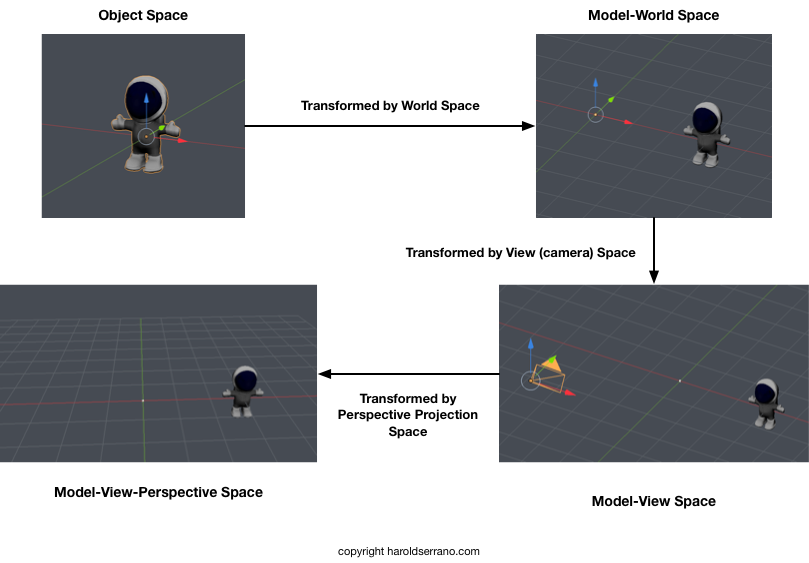
Because the GPU needs the Model-View-Projection (MVP) coordinate space to place the character on the screen correctly.
To produce the MVP space, the Model Space is transformed into the World Space. The product is then transformed into the Camera (View) Space. Finally, the resulting space is transformed by the Perspective- Projection Space, thus producing the correct MVP space required by the GPU.
The attributes of the entities are sent to the GPU during the initialization of the game whereas the space coordinate is continuously transmitted to the GPU during every game tick by the engine loop.
With these set of information, the GPU can adequately render the 3D entity.
Updating the character state
The next stop in the engine loop is the update stage. The engine calls each entity's update method and checks for the current state of the character. And depending on the state, the game developer sets the appropriate actions.
For example, let's say that you are moving the joystick in the game controller which makes the character walk. The moment that you move the joystick, the state of the character is changed to Walk. When the engine calls the update method of the entity, the walk animation is applied.

However, at this moment, the space-coordinate of the entity is also modified — specifically the rotation and translation components of the 4x4 matrix. And the new values are transformed into the MVP space and sent to the GPU, thus creating the walking motion that you see in games.

Physics Engine
Most game engines provide a Physics Engine (with Collision-Detection System). A game engine interacts with this system through the Engine Loop.

The primary purpose of the Physics Engine is to integrate the Equation of Motion; which means to compute the velocity and position of an object from an applied force. From the newly calculated position, the space coordinate of the model is modified, which creates the illusion of motion.
For example, let's say a game has Gravity enabled. Gravity is a force that acts downward.
During every game-tick, the physics engine computes the new velocity and position of the character, thus modifying the coordinate system of the entity. Which upon rendering, creates the illusion that the character is falling due to gravity.

Collision-Detection System
The Collision-Detection System works hand in hand with the Physics Engine. And it's purpose is to detect a collision, determine where the collision occurred and computed the resultant impulse force. Just like the other components, this system is called continuously by the Game Engine Loop.
Once the system detects a collision between two objects, it tries to determine the exact location of the collision. It uses this information to compute the collision response correctly. That is the impulse force that will separate the two colliding objects. And once again, the space-coordinates are modified, sent to the GPU, thus creating the illusion of collision.

Entity Manager
There is a fourth component that works hand-in-hand with the engine loop. It's the Entity Manager. Its purpose is to provide game entities to the engine loop as efficiently as possible.

Let's say that a game has over 100 game entities; 3D characters, 2D sprites, images, etc. The data structure that you use to store these entities will affect the speed of the game engine. If you were to store these entities into a C++ Vector Container, the engine would slow down since it takes time to traverse the elements in a vector container. However, if these objects were stored in a data structure known as a Scenegraph, the engine's speed will not take a hit.
Why?
Because a scenegraph has a fast-traversal property.
The Entity Manager is in charge of managing the scenegraph, which provides the entities to the Engine Loop for rendering and update.
It is the Game Engine Loop that connects all the components of a game engine that makes video games possible. In my opinion, it is the heart of a game engine.
Hope this helps.