Enabling communication among players -Soccer Game v0.0.2

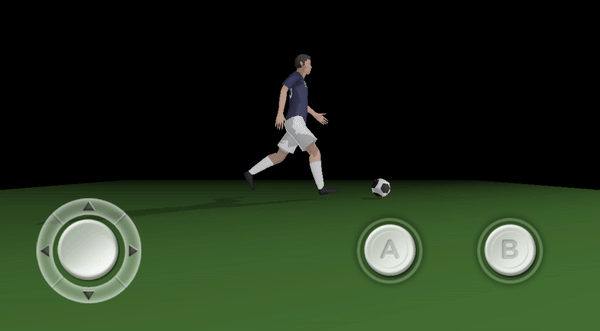
Developing a soccer video game has been more fun that I thought it would be. It has also been harder than I expected. Aside from coding, the part of development that has taken me time is creating the animations. I have done my best to create several animations that mimic a player movement on the field. As of today, I have created 21 animations and counting.

This month, I focused on developing a State Design Pattern and a messaging system for the AI. As the video below shows, the players can now communicate among themselves and be alerted whenever the ball is being passed to them.


State Design Pattern

State machines are taught using if-then or switch statements. Although such implementation is OK for small projects, it also leads to spaghetti code in complex projects.

A better way to implement a State Machine is with a Design Pattern known as State Pattern. The pros of using such pattern are that your State machine becomes modular and flexible. That is, you can remove or add as many States into your code without making it a chaotic mess.

Thus, instead of using a switch statement to implement a state machine, you use classes to represent a state object. Below is an illustration of the State Object:

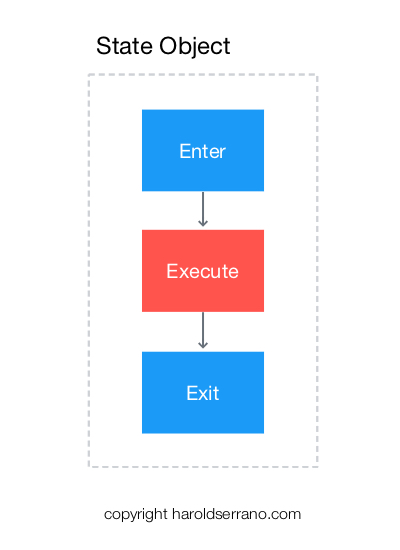
Every state object contains an enter, execute and exit methods.

The enter and exit methods are useful methods in an A.I. system. For example, you may have a 3D model that as it enters the "state," it waves his hand. Or it performs a goodbye gestures as it exits the "state."

Let's see how this works:

Assume that the player is in an idle state; it is just standing on the field waiting to change from an idle to dribbling state.

When the player changes to a "dribbling" state, the "enter" method is called. The "enter" method plays the dribbling animation.

The "execute" method is then called in a continuous loop. In our instance, the player keeps dribbling the ball, until a message is sent to change state.

When the player receives a message to change state, the "execute" method is stopped, and the "exit" method is called. The "exit" method ends the dribbling animation.

Here is an illustration of the process mentioned above:

State Manager

A soccer player requires several State Objects. For example, every player needs a running, passing, dribbling and marking state. A State Manager class is required to manage all these state objects.

The state manager is responsible for changing the state of the player, and for keeping track of the previous state. The State Manager is also responsible for calling the "enter," "execute" and "exit" methods in the appropriate order.

For example, when a player changes states, the State Manager calls the "exit" method of the current State object. It then calls the "enter" and "execute" methods of the new State object.

State Manager.jpeg

Messaging System

An AI system requires a messaging system to allow objects to communicate. For example, the player dribbling the ball can alert a nearby player of an incoming pass.

However, players don't receive these messages directly. Instead, the messages are received by the players' state objects.

Thus, aside from implementing an "enter," "execute" and "exit" methods, each state object also implements a "receiveMessage" method. The "receiveMessage" method acts upon the message received. For example, it can ask the player to change to a new state, or if the message is not appropriate for the current state, it ignores the message.

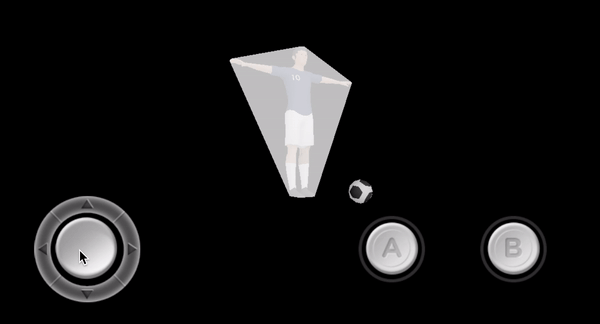
In the video above, when the button is pressed, a message is sent to the dribbling player with a request to pass the ball. The player changes states from dribbling to Passing state. Then another message is sent to the nearby player most likely to receive the ball.

How I managed to develop a game engine?

Recently I was analyzing how I was able to develop a game engine. It was a complex project which took approximately 15,330 hours. All in all, the basic framework of the engine took about three years to complete. So, how was I able to complete such enormous task?

I turned coding into a habit

Developing a game, app or a game engine can turn into a chaotic process if you don't break it down into simple tasks. And it can become overwhelming if you try to code things all at once. For example, the hardest part of a game engine is developing the physics engine. There are so many moving parts in a physics engine that can overwhelm anyone.

I manage this complex project by doing the following: For a particular feature of the engine, I would write down which Class I should implement. Then, I would write down all the methods/functions necessary for the Class. Then, instead of saying: "Today, I will implement Class X," I would instead focus on implementing ONLY one method/function a day. The key here is that I trained my brain to code every day. Even if I coded for only 15 mins, I still showed up to code every day.

By the second year of development, coding had become a lifestyle for me; just like working out and eating healthy is to me. The day I didn't code, it felt awkward. And I would find myself coding even if I wasn't planning to do so.

I used pen and paper before coding

I learned that using pen and paper before coding can save you hours of development. The first iteration of the engine was a total mess. I ended up throwing it into the trash can. The second time around, I started sketching the game engine operations, methods, classes on paper way before I started to code.

Nowadays, if I'm about to implement a method/function, I usually draw a sketch of its operation and how it may affect other parts of the engine. Having a sketch of what you are about to implement not only saves you hours of work, but it can help you avoid bugs which you may be introducing into your app unconsciously.

I used the power of visualization

You may think this is crazy, but trust me, it works. Visualizing the finish line is the most useful thing if you want to achieve your goals.

It took me about a year to implement the Collision Detection System of the engine. As I implemented the collision detection features, I would visualize the features working way before they were completed. For example, instead of me saying, "I'm implementing the GJK algorithm" I would say to myself "I'm DONE implementing the GJK algorithm" and I would visualize 3D objects colliding on the screen.

Call me crazy, but for some reason visualizing the finish line way before you cross it is a powerful tool. It worked for me, who knows it may also work for you.

Hope these tips can be of use to you.

Enabling a player's kick animation-Soccer Game v0.0.1

At the start of this year (2017), I decided to develop a full blown game using my game engine.

For a couple of weeks, I struggled to come up with the type of game to develop. Since I am not a gamer, this task was difficult. Although I am capable of developing a game (technically-wise), I lack gameplay knowledge.

So, I started playing several video games. Unfortunately, most of them bored me within a couple of minutes. I guess that is why I never got into games; some of the games I played in the past bored me quick. Of course, Super Mario and Pac-Man never had that effect on me.

As I searched for the type of game to develop, I ended up playing a soccer video game. Instantly, I knew this was the kind of game I wanted to develop. I didn't even think about it twice; I just knew this was it.

Not only do I enjoy playing soccer (Currently I play in two leagues), I also know the game quite well. I understand the role of each player and the strategies used. And since developing a soccer video game requires a lot of AI (Artificial Intelligence), this knowledge will be quite useful.

The video below shows the initial development stage of the game.


As the video shows, I was able to create the effect of dribbling and kicking motion through the use of the game engine's animation system and physics engine.

How did I do it?

Animations

The first thing that I focused on was in developing several animations. I am not an animator by any means, so I had to read several books and do several test animations. Luckily, I found this book The Animator's Survival Kit. It was a great help. With it, I was able to do a walking, running and kicking animation as shown below:

Now, one of the things that you need to consider is the transition between animations. To make it look smoothly, you need to blend each animation. I ended up doing this by interpolating the last keyframe of the previous animation with the first keyframe of the new animation. Here is a transition from running to kicking animation:

Creating the effect of a kick

The logic to kick a ball is very simple. Once there is a collision between the soccer ball and the player's feet, an impulse force is exerted on the ball, thus producing the kicking effect.

For a collision to occur, the collision detection system computes a convex-hull bounding volume for each model; ball and player. However, the problem is that the player's convex-hull is not updated during each animation. Let me explain the problem with more detail.

As you may know, a 3D animation is possible through the use of an armature. Unlike animation in 2D games, which consists of sprites played sequentially over a period, animation in 3D games consists of an armature influencing the vertices of a 3D model. An armature consists of several bones. The motion of these bones, affect the vertices of the mesh, thus creating the illusion of an animation. The video below shows the bones of a 3D model during a running animation (in Blender):

The video below shows the player with its convex-bounding volume using the game engine.

As you can see, the bounding volume does not follow the animation. Thus, when a player extends its foot, and the soccer ball is on the foot's path, the engine will not detect the collision.

You may ask, "Why don't you update the convex-hull on every animation?" The reason is that computing a convex hull is an expensive operation.

It took me while to figure out how to detect a collision with the foot and the ball. I ended up playing FIFA and other soccer games for hours trying to figure out how they do it. I tried different methods, but they all failed.

Finally, around 2 am, I got an idea how to implement the most logical solution to my problem. It took me about 4 hours to code it.

This is what I did:

Since I need to know the feet bone's position during each keyframe, I linked two cubes to the player as children objects. These cubes represent the position of the player's feet. I then retrieved the position of each feet bone during each keyframe and used this information as the cube's new position. Here is a video of the cubes following the feet path:

I then enabled collision detection between the soccer ball and the cubes. Thus, as the animation runs, the cubes follows the path of the feet. And if the ball happens to be on the cube's path, a collision is detected; thus exerting a force onto the ball. Here is a video showing the effect:

Is this how other studios do it? I have no idea, but it works for me.

State Machines

One of the reasons why I decided to develop a soccer game was because I wanted to know how to develop an AI (Artifical Intelligence) system. It so happens, that a soccer game requires a complex AI system. I felt that learning AI through a soccer game would be time well spent.

I bought this book Programming Game AI by Example. This book has a whole chapter on how to develop a soccer game's AI. To be honest, it has been a fantastic book and has helped me a lot through the initial stage of the game.

An AI system requires a Finite State Machine. In simple terms, a state machine transitions from one state to another state depending on a current condition.

As of today, the soccer player in my game has these states:

  • Idle
  • Halt Ball
  • Dribble
  • Kick Ball

Depending on a condition, the state machine transitions the player from its current state to a new state. For example, it can transition from a "dribble" state to a "kick ball" state.

You would agree that a simple way to implement the state machine would be to implement an "if-then" or a "switch" statement. However, this is a naive way to implement a state machine. And you should avoid these type of implementations in complex projects.

Instead, you should use State Patterns to implement a state machine. A state pattern is a design pattern which encapsulates each state in an object class. Each class contains the behavior for a particular state. Thus, instead of using "switch" statements, you will use objects that will implement the states' logic in a clean, modular way.

Thanks for reading

Game Engine Beta v0.0.4

It has been a month and a half since I gave you an update on the engine. I have been very busy implementing new features and fixing several bugs with the engine. Some of the new features are shown in the video below:


Improvements

One of the major features that I implemented in v0.0.4 is a particle system. To be honest, the particle system is very primitive. I am still learning how to create several particle effects, so expect more effects soon. As you can see from the video, I was able to implement a "kind of" explosion effect.

I also implemented collision filters. Collision filters are useful whenever you want a particular type of objects to collide with one another but not with any other kind. For example, object A and object B can collide; object A and object C can collide, but any collision between object B and object C is ignored.

A minor detail which I had ignored all along was to enable multi-touch in the engine.

Issues

While developing the second game demo, I started noticing glitches with the OpenGL manager. With a particular type of objects, the OpenGL manager would spit out an error. This issue was hard to detect, and it took me quite a few weeks to find it. I thought I had fixed the bug, but as I was developing this beta version, the OpenGL manager complained again (once). The problem with this bug is that it is intermittent and very hard to reproduce.

I'm considering porting the engine to work with the Apple Graphics API, Metal. However, I'm still weighing the pros and cons of using OpenGL vs. Metal. One thing I have noticed is that Metal is a lot easier to work with than OpenGL, but that is just my opinion.

Thanks for reading

Components of a Game Engine

In 2013, I decided to develop a Game Engine from scratch. Why did I decide to do so, I still do not know. However, what I do know, is that I wanted to do something beyond my intellectual abilities.

When I started, I knew nothing about game engines, OpenGL, Computer Graphics. My C++ skills were limited, and I remember having problems grasping Linear Algebra during college.

Developing a Game Engine demanded that I wake up earlier than most people (5:00 am), so I could squeeze in about two hours of coding before heading to work. It forced me to code until the late hours of the night (approx 7:00 pm-1:00 am). And it made me say goodbye to my weekends. Weekends that I spent coding in my room or at Starbucks instead of enjoying life.

Then on July 21, 2016, around 2:00 am, I did it!!! I finally finished the basic framework of the game engine. It took three years, about 1,095 days, approximately 15,330 hours of work.

Throughout this journey, my math, coding, and engineering skills improved tenfold. However, it would be worth little if I didn't share what I've learned with you. Thus, I decided to share all my knowledge on this blog. As of today, I have written over 175 articles on this blog.

I have decided to compile my best articles into an ebook. In this ebook, Components of a Game Engine I share all that I know about game engine development. I talk about computer graphics concepts, such as the rendering pipeline, shaders, lighting. I also share concepts on computational geometry and its use in collision detection. Furthermore, I explain several algorithms used in game engines.

Components of a Game Engine will not make you a guru on game engines. But it will give you a solid understanding of the mechanics and elements of a game engine. The materials in the ebook are freely available on my site. However, if you want to have all these articles in an organized manner, I recommend you to get a copy of the ebook.

I would appreciate if you support this site by buying my new ebook Components of a Game Engine.

Thanks