When I started as an indie-developer, performing Git operations through a graphical interface was ideal. However, lately I have realized how much the GUI has held me back.
I'm not saying that using a Git GUI is a bad practice. Not at all. If you are a new developer, your focus should be in learning a new programming language and the proper way to develop an app. You shouldn't spend time learning EVERY Git operation. You have enough on your plate to be learning how to rebase, revert, etc. In this instance using a Git GUI can be helpful.

Using Git through a GUI
However, as you grow as a developer, a GUI becomes a roadblock more than a valuable tool. I started noticing this in the last beta version of my game engine. In the back of my head, I knew it was time to start using the terminal. I also knew that my basic Git knowledge was insufficient to further the development of the engine.
This past weekend I decided to spend my free time learning Git commands. I decided to revisit every git command I knew and visualize what it does. I also learned new Git commands. Since I am a visual learner, these tools helped a lot:
To be completely honest, I have been intimidated by the terminal for quite a while. I was afraid that I was going to issue the wrong Git command and completely mess up my game engine. However, that feeling has changed. Now that I can visualize what each command does, the terminal does not scare me anymore. It sounds funny that I say this, but through the terminal, I feel the power in my hands. (Yeah, it does sound weird.)

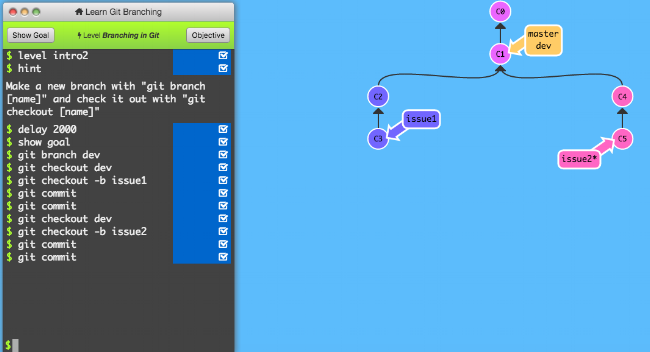
Using Git through the terminal
However, I can't completely say Good-bye to the Git GUI. Unfortunately, the Git terminal is terrible at graphing branch dependencies (see image below) and showing diffs between files. Nonetheless, I see myself executing all Git commands through the terminal, and whenever I need a visual, I will use the Git GUI.

Git log graph output
My workflow and the tools I use have changed over time. When I started as a developer, I could not understand why someone would prefer the terminal over the GUI. Years later, I realized that it was advantageous to comprehend Git operations from a terminal perspective. And even though I took the time to learn the basics of Git using the terminal, my preferred choice was the GUI. Today, as the engine has become more involved, I realize that is time to say "Hello" to a tool that intimidated me in the beginning.
My advice to all new developers is this: If you are content using a Git GUI, keep on using it (but do learn the basics). If you are intimidated by the terminal, don't force yourself to use it yet. As your knowledge grows and you develop complex applications, you will realize the shortcomings of a GUI. The best learning occurs when you are curious. And your curiosity to perform various Git operations will remove the intimidation you may have with the terminal.
Hope this helps.