Before we start working on the Rendering Engine, I figured that it would be a good idea to teach you how to use Git. Git is a Version Control System (VCS). It is a very popular tool used by many developers. I love Git. It is very simple to use with a command line. And simpler if you use a GUI.
What I'm about to teach you is simply the tip of the iceberg when it comes to Git. There are dozens of books on Git. My favorite is Learning Version Control with Git. I recommend you to get a copy if you want to learn more.
Let's begin,
What is a Version Control System?
Think of a Version Control System (VCS) as a kind of database which records the changes you make to your project's files. It allows you to go back in time and review any changes that you have made.
Repositories
The most basic building block of a VCS is the repository. Repo for short. The repository is a kind of database where the VCS stores all the versions that accumulate throughout the life of your project.
There are two types of repos:
- Local
- Remote
A local repo resides in your local computer, whereas the remote repo resides on a remote server on the internet. When using Git, your local repo resides as a .git folder inside your project's root folder. A remote repo also contains a .git folder even though no actual working files are associated with a remote repo.
Branches
When you start working on a project, you may have the following items in your todo list:
- Implement feature-A
- Implement feature-B
- Fix bug-001
- Fix bug-002
As a rule of thumb, each of these implementations should be decoupled from each other. Fixing bug-001 should not break feature-A and if it does, you should be able to revert back to the initial state. This decoupling between implementations is possible thanks to a concept in VCS known as Branches.
Your applications, you may have the following branches:
- Master
- Development
- New Features
- Bug Fixes
- Experiments
Your stable code always resides in the Master branch. Everytime you have a new issue to fix or implement, you create a branch, i.e, bug-002. When it is complete, you merge this branch into the corresponding branch. Here is a nice illustration on how branches work.
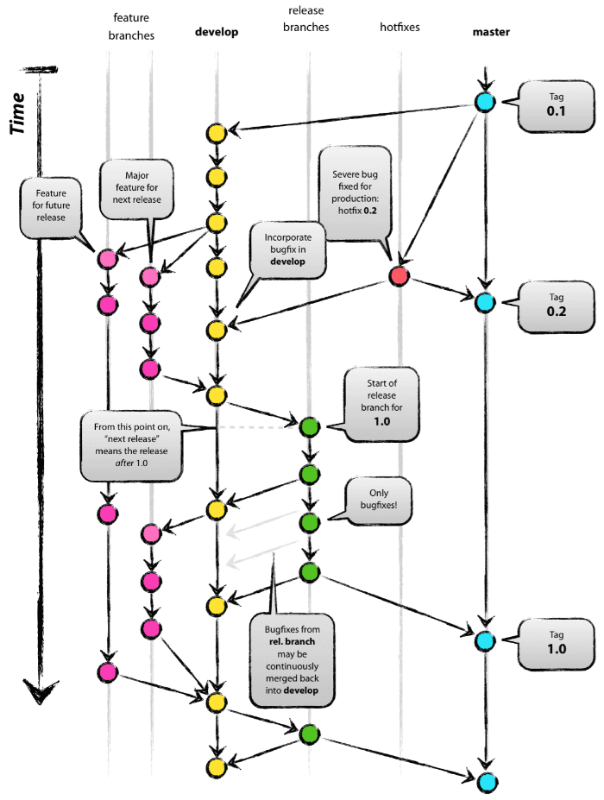
Original blog post: http://nvie.com/posts/a-succesful-git-branching-model
The power of branches is that it allows you to work on multiple issues at the same time without worrying of breaking previous implementations.
Commits
A commit is a snapshot of your complete project at a specific point in time. Every time you do a commit, you create a new, different version of your project. Commits are done in branches. For example, in the illustration below, each yellow and blue circle represents a commit.

Original blog post: http://nvie.com/posts/a-succesful-git-branching-model
If you are confused about the terminology, don't worry. Once we start using Git, it will start to make sense.
Using Git
Let's start using Git. We are going to create a simple Xcode project. You are going to initialize Git within the project. Then you will create several branches and start making commits into Git.
Installing Git
Most likely your Mac has Git already installed. However, if it does not, you can install the package from here. Once this is installed, you can start using Git by starting the Terminal app on your Mac. The terminal app is found in the Application/Utilities folder.

Terminal App
Fire up the terminal and configure your name, email and enable output coloring as shown below:
$ git config --global user.name "YOUR NAME"
$ git config --global user.email "YOUR EMAIL"
$ git config --global color.ui auto
Initializing Git
Create a folder on your desktop with the name GitTutorial. Using your terminal browse to the folder directory.
$ cd Desktop/GitTutorial
$ git init
$ ls -la
Ignoring Files
Independently of which IDE you use (Xcode, Eclipse, etc), Git tracks the files produced by these IDEs during builds. Obviously, the only files you want to track are your source files and not build files. Git allows you to configure which files to track and which ones to ignore. All files which should be ignore by Git are placed in a system folder called .gitignore. (Notice the dot in the folder name. This means that it is a system folder.)
You have to create this folder in the root directory of your project. In our case, inside the GitTutorial folder. Inside the .gitignore folder you add the files from the IDE which you want to ignore.
In this project, we are going to use Xcode with C++. So, which files should Git ignore? Lucky for you, there is a great tool by Toptal called gitignore.io which produces these files.
Go to gitignore.io, type in the IDE and language we are going to be using and click on Generate. (You can also select to Download the file.)
Gitignore.io will generate an output in a new browser window. Copy the generated text in your favorite text editor. Save the file as a .gitignore file in the project directory. In our case, inside the GitTutorial project folder.

I use coda whenever I have to create a .gitignore file since it allows me to create system files.

To view the hidden .gitignore file, execute the following command in the terminal:
$ ls -la

Creating a project
Fire up your Xcode IDE and create a new Command Line Project.

Xcode IDE
Give it the following name: MyAwesomeApp and save it in the GitTutorial folder.

When you initialized Git within the GitTutorial folder, you instructed Git to keep track of any changes that occurred within the folder. If you execute the following command:
$ git status
Git outputs all the recent changes that have occured within the folder.

The output message shows the following information:
- The branch where changes occurred, i.e, Master branch
- All new files recently added
- Untracked files, i.e. .gitignore
Upon initialization, Git creates a default branch, in this case the Master branch. We are going to commit these new files into the master branch by executing the following:
I will go into more details about Staging and making Commits in a second.
$ git add -A
$ git commit -m "Making initial commit of project files"
At this point, the Xcode files have been committed to the master branch. And according to Git, your working directory is clean. Meaning that no further changes have occurred.
Verify this by executing the following:
$ git status
Creating Branches
During initialization Git creates a default branch known as Master. There is nothing preventing you from working off this branch. However, it is not recommended. Instead, you should create a child branch from Master and work off the inherit branch. We are going to create the following branch hierarchy:
- Master
- Development
- Feature-A
- Issue-001
- Development
The development branch is inherited from the Master brach. Both Feature-A and Issue-001 branches are inherited from the development branch.
Let's create the development branch by executing the following command:
$ git branch development
The command above created a branch called development but it does not make it the active branch. To make the development branch active, you must checkout the branch.
$ git checkout development
If at any point, you are unsure which branch is the active branch, simply execute the following command:
$ git branch
The asterik, as shown below, states which branch is the active branch.

Making Commits
Recall that a commit is a snapshot of your complete project at a specific point in time. Whenever you add a new feature to your application or fix a bug, you should commit your project. Every time you do a commit, you create a new, different version of your project within the active branch.
Let's make some simple changes to our project.
Inside the main function in main.cpp file, do the following:
int main(int argc, const char * argv[]) {
    // insert code here...
    std::cout << "Hi, I'm using Git. The development branch is now active";
    return 0;
}
Save the changes.
Let's execute the Git status command and see what changes Git has detected in our branch:
$ git status
Git spits out the following message stating changes in the main.cpp file:

In Git, a commit is a two step process. First, files are added to a Staging area using the add command. For example:
$ git add main.cpp
$ git commit -m "Made changes to main"
Execute these two commands to commit the changes into your development branch.
If you were to make the master branch active, and take a look at the IDE, you will notice that Git reverted your project to the original version of the branch. If you make the development branch active again, Git reverts your project to the place where you left off. This is why Git is so cool and powerful. You can be working off several branches, without ever losing your work.
Merging Branches
Let's create two other branches within the development branch which will be used to implement Feature-A and Issue-001.
$ git branch featureA
$ git branch issue-001
Checkout the featureA branch by executing the following command:
$ git checkout featureA
Next, make changes to the main function in main.cpp:
int main(int argc, const char * argv[]) {
    std::cout << "Hi, I'm using Git."<<std::endl;
    std::cout<<"This is feature A"<<std::endl;
    return 0;
}
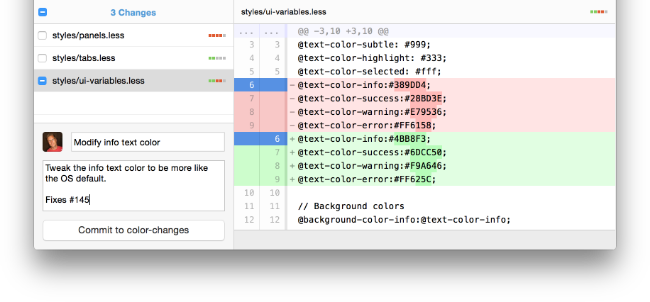
Again, everytime you add a feature or fix a bug, you should commit your changes. You already know how to commit in Git, so go ahead and commit the changes. Below is a screenshot of what you should see:

Just like the master branch, you should never work off directly from the development branch. Instead, you create children branches and merge them into the development branch once the implementation is complete.
Merging a children branch into the development branch is very simple. First, make the development branch the active branch (i.e., checkout the development branch) and then simply call the merge command:
$ git checkout development
$ git merge featureA
All the changes done in the featureA branch will be merged into the development branch.
If you take a look at main.cpp, you will notice that the changes made in the FeatureA branch are now part of the development branch. From this point on, you can create more branches from the development branch and keep adding features to your application.
What's next?
In this article, you have learned what a VCS is, how to initialize Git, what .gitignore file is, how to create branches and how to commit changes. All of this is only the tip of the iceberg when it comes to Git. There is a lot more for you to learn. For example, how to use Git with a remote repository.
A site which I have learned a lot from is Git-Tower. It has tons of information on Git. I have also learned a lot from Vincent Driessen's Branch Model. I recommend to check them out.
Finally, I tend to get questions on whether to use Git through a terminal or through a GUI. My answer is to use whatever makes you more efficient at your job. I use Git Desktop daily for my game engine. I hardly ever use the command-line.
Github Deskop
The GUI makes working with Git so much easier and a lot more productive. However, using the command-line forces you to understand Git at a deeper level. This is always a good idea. Because as a developer, being productive and having a deep understanding of Git, makes you better at your job. So, choose the tool that makes you productive and set aside time to truly learn Git.
